What's In A Title?

The blog title is my take on my favourite quote from Stephenie Meyer's Twilight novel, when Bella realises she is in love with vampire Edward. My version is slightly less impressive than that in the book but never the less true:


"About three things I was absolutely positive, first I was an obsessed crafter, second, there was a part of me - and I didn't know how potent that part might be, that thirsted for beautiful craft materials, dies, stamps, papers, cardstock etc, and third, I was unconditionally and irrevocably in love with scrapbooking and cardmaking"


Sunday, 11 April 2021

Going Floral with Lisa Horton’s 3D Embossing Folders


I’m a huge fan of all things Lisa Horton, including her fabulous 3D embossing folders.  This card was made using one of her latest releases, the Roses 6” x 6” 3D Embossing Folder and Complimentary Outline Die set.  The idea is that you use the die to cut out a rose from paper or card then pop it in the embossing folder in the area indicated on the packaging (which I marked with a pen on the outside of the folder), run the folder through your die cutting machine and the die cut comes out with a superb 3D embossed effect.  

For this card I inked the embossed rose die cut with some pink Distress Oxide ink.  I then embossed a  piece of white card in the embossing folder to make a rose background and I lightly ran the pink oxide ink around the outer edges to give it a little colour.  I used the same ink to colour a plain piece of white card stock, just around the visible edges then stuck this to a blank white card base.  I added the embossed panel on the top and added the embossed rose die cut to the corner of the card using some 3D glue gel.  I used another of Lisa’s new folders, the Variegated Leaf 3D Embossing Folder and Complimentary Die set to cut and emboss 3 leaves which I coloured with Distress Oxide ink and added it to the card with 3D glue gel.

The sentiment is from another of Lisa’s stamp and die sets, called Hellianthus Cluster.  I stamped using Crafters Companion’s quick dry Fuchsia ink then used the corresponding die to cut out the sentiment and add it to the card again with 3D glue Gel.  The bee I found on my desk from a previous project.

Wednesday, 7 April 2021

A New Home Card


Here is another project I made using digital cutting files and my Scan n Cut machine.  This time the cutting files were purchased from the Birds Cards website, the file is called Bird House and I cut all of the pieces at 140% to make a larger card.  I cut the shaped card base from 12 x 12 300 gsm pearl cardstock and  used pink and blue cardstock for the house and roof and I inked around all the panels in a corresponding ink.  The main blue house panel I embossed using one of Lisa Horton’s amazing 3D embossing folders, called Weave and added it to the card base then layered up the roof panels to give a 3D effect.  The circle that was cut out from the blue panel as part of the cutting file I flipped over to show the lighter blue colour on the other side and added a sentiment cut from black cardstock.  I stuck the circle inside the aperture on foam pads.  The flamingo is a cutting file on the Scan and Cut and I cut it out using scraps of leftover card, inked the pink edges and wing and added a googley eye.  The small flowers are shop bought and attached them to my card front with my hot glue gun.

This card was requested by my daughter to give to her best friend when she moves into her new house shortly.   I hope she likes it.

Sunday, 4 April 2021

Chic Chick Treat Box


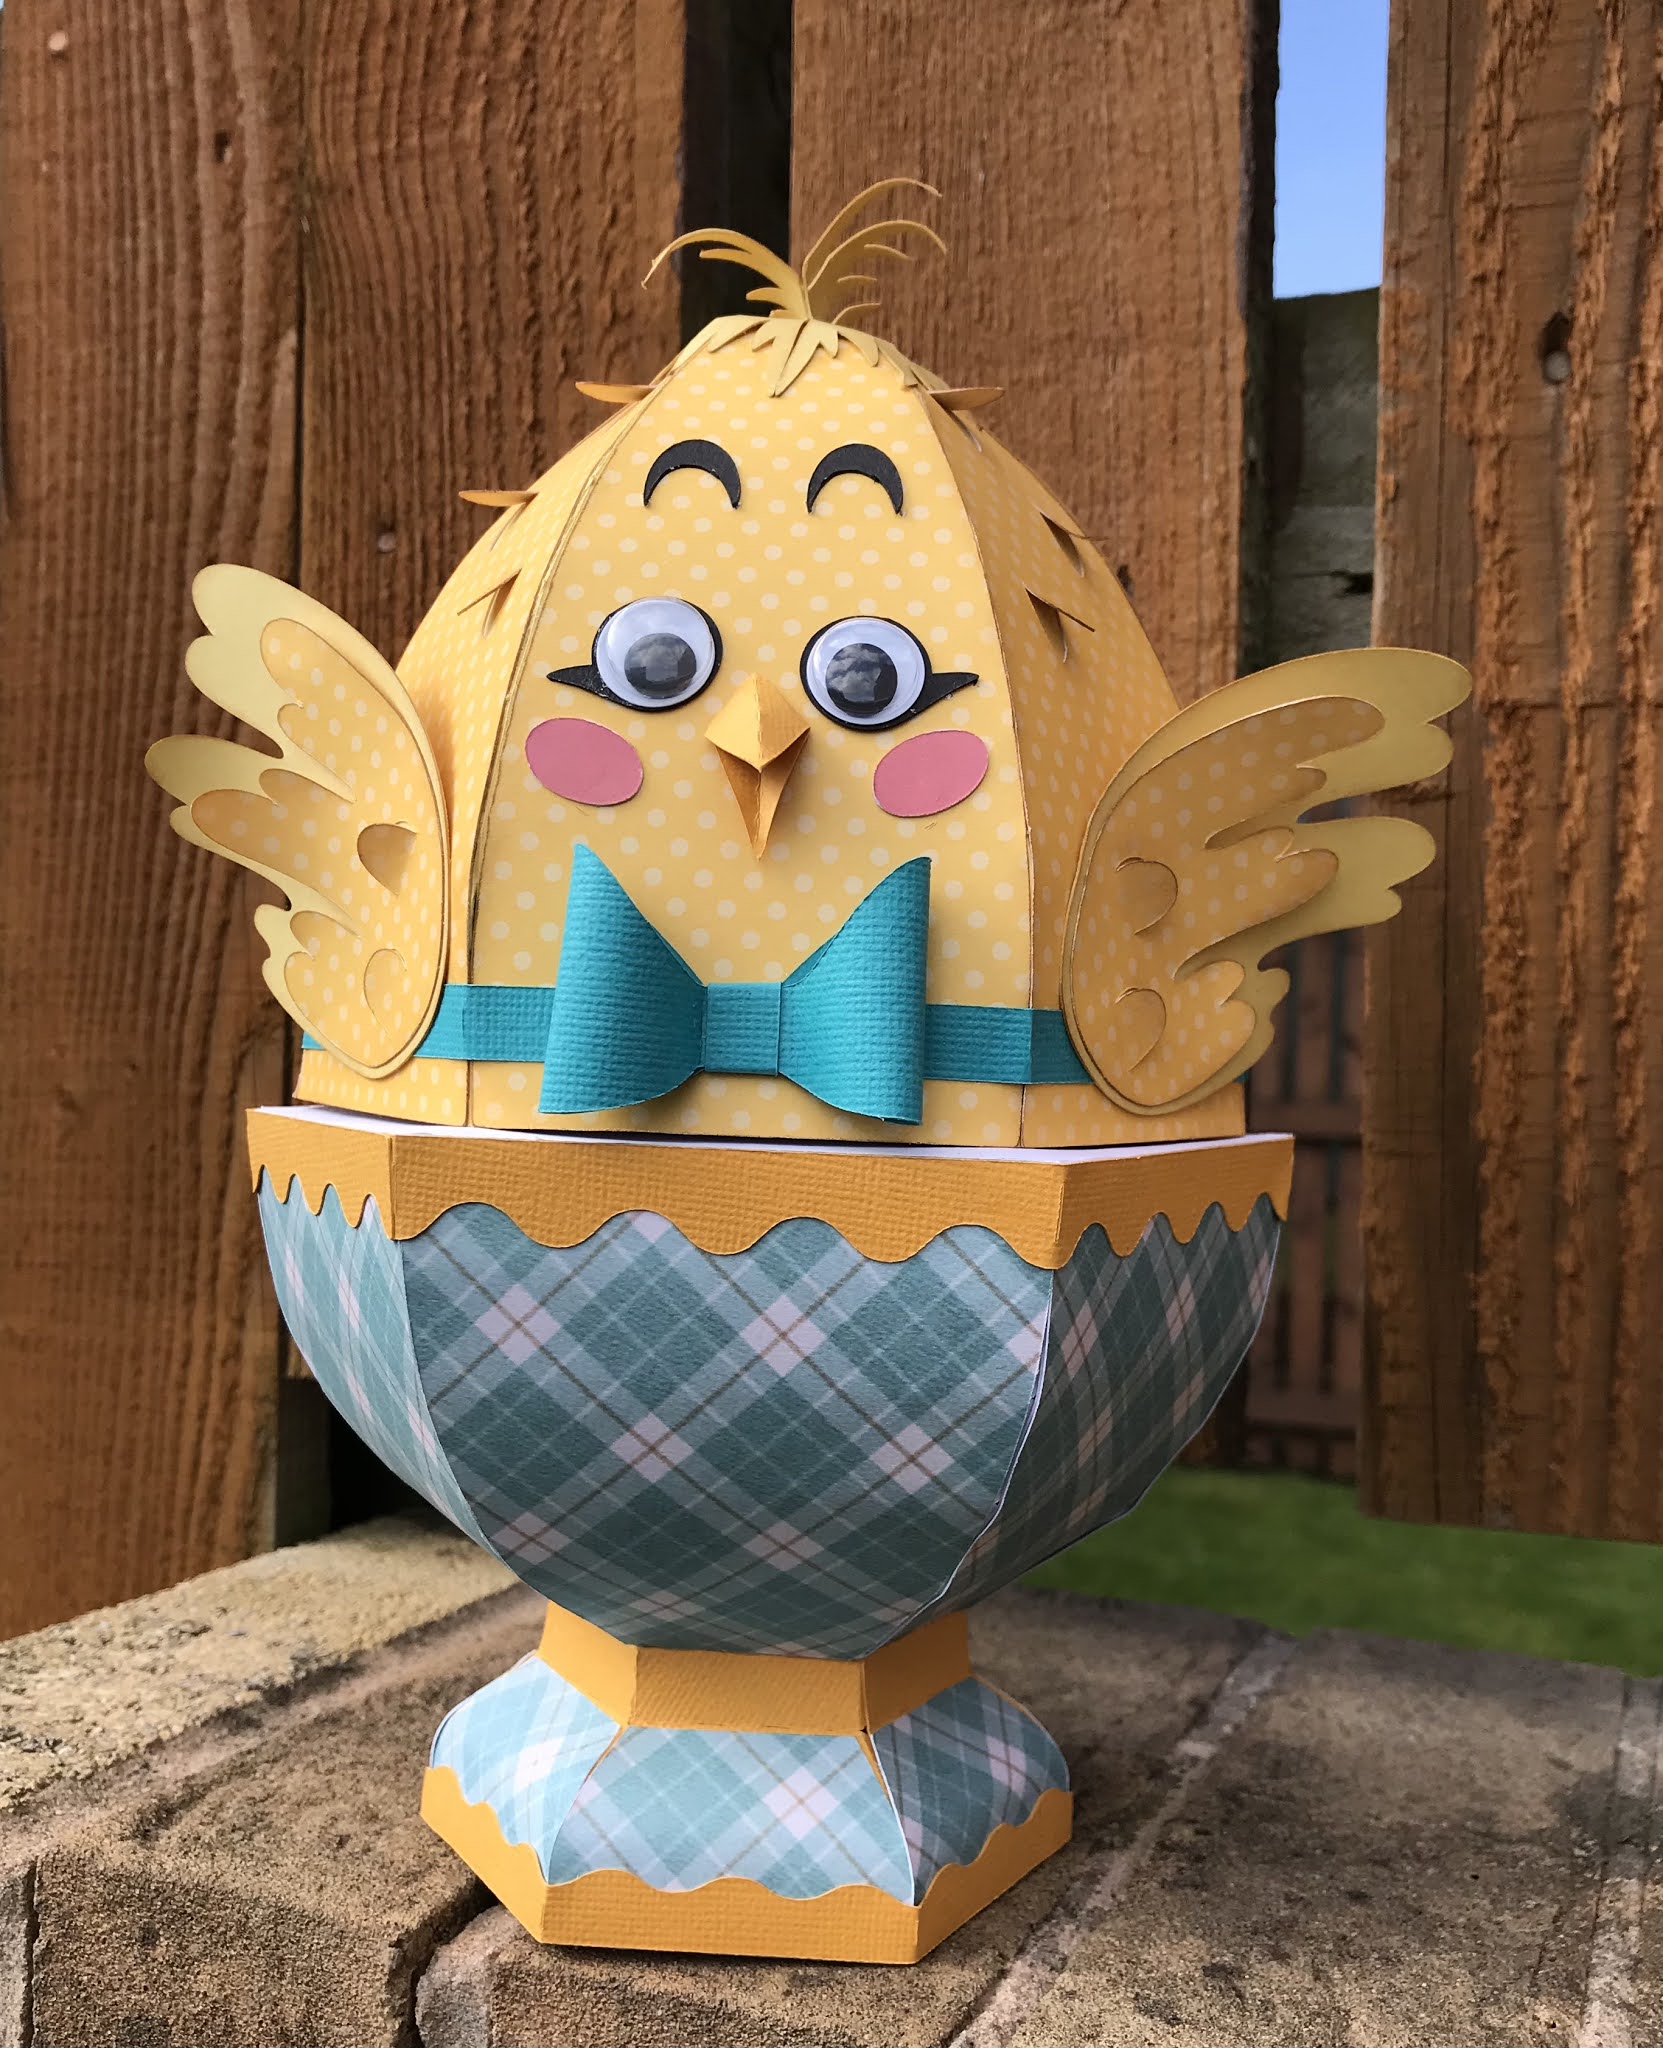
Oh my goodness, how cute is this little chick box?  I made this over the weekend using my scan and cut and SVG files from Dreaming Tree’s Chic Chick Treat Box file.  This was part of an Easter themed collection given away during March if you spent 10 dollars or more on their website - www.3dsvg.com.  The other items in the free collection were a gorgeous tulip card and a carrot bunny house.  The designers of these products are amazingly creative and the craft along videos are brilliant.

I started making this around midnight, laid in bed, wide awake with the card and paper pieces cut earlier in the day.  I’ve never crafted laid flat on my back, with my iPad on my knees before and I probably won’t be doing it again as I got glue everywhere!  

I planned to fill the box with some cute mini Toblerone chocolates my mother in law gave me for Easter but I appear to have eaten most of them so I’ve left it empty and put it on display in my lounge.

Monday, 29 March 2021

Easter Baskets


Over the last three weeks I have been making two Easter baskets for family members.  For the baskets I have used my Scan n Cut machine and cutting files I purchased from the svgcuts.com website called Picnic in the Park SVG kit.  

I used double sided pearl cardstock in a pinky peach colour for the base of the basket and some dark red card strips for the woven pattern on the side of the basket.  To decorate the basket I used papers from the Rose Garden paper pad by Crafter’s Companion.  After cutting the paper panels I inked around them using some brown quick dry ink before sticking them to the basket.  I attached the handles using some peach coloured brads.  I’ve decorated the side of the boxes with flowers and leaves cut using the gorgeous Climbing Rose die set by Sharon Callis.  The flower bases are rolled using a quilling tool and they look fabulous in whatever material you use and are so easy to make.  The white fronds were cut using dies by Bright Rosa and a drop of Tonic Nuvo Dream Drops added to each frond.  I cut the tag from the pinky peach pearl cardstock and added a black die cut sentiment, sorry, I can’t remember where I got it from.  I also made an Easter Bunny using the Bunny die set by Elizabeth Craft Designs.  I cut a thin strip of card and glued the bunny to it then tucked the strip into the opening at the back of the box.  To finish it off I added the tag on a matching ribbon.

I bought a large box of chocolates, split the chocolates between two cellophane bags, stapled the bag tops closed and put one bag inside each side of the basket along with the label from the chocolate box and the insert that shows what the chocolates are.  I took real willpower not to pinch a chocolate or two before sealing up the bags.  I hope the recipients enjoy the baskets as well as the chocolates.

Saturday, 27 March 2021

That’s Another Fine Mess!


I bought this wonderful set of stamps from Craftstash recently.  The set is called Stan and Ollie by Aall and Create.  In the range there is also a Marilyn Monroe stamp set and a Charlie Chaplin stamp set.  I’ve been making a lot of slimline cards recently and for this card I used a slimline die set by Newton’s Nook to cut the frame and window panel from black Centura Pearl cardstock with silver glitter card behind.  I stamped the images with a Tonic black hybrid inkpad and coloured with Spectrum Noir Triblend pens before fussy cutting the characters out and adhering them to the card with foam pads.  I finished off with a thin layer of  Glossy Accents on the hats and some gems top and bottom.

It is nice to be able to try products by a variety of different brands, having resigned from the Crafters Companion Design Team in January to allow me to increase my working hours temporarily until the end of March.  I’m reducing my hours again in two weeks so I will have so much time to craft.  I’m a very lucky lady.


Sunday, 18 August 2019

Create A Card Dies


This was my second allocation for Crafter’s Companion Design Team.  I worked with two dies from the Gemini Create a Card range, Ornamental Baubles and Christmas Greetings.   These dies cut into the card but they don’t have an outer cutting edge so the design stays within the card.  I loved working with these dies, they are so versatile and cut like a dream.   They make gorgeous shaker cards when used with acetate and look great when coloured with Sparkle pens.  


My favourite make with these dies was this Christmas planner.  I used the die to work out the size of the book and used a die cut as a decoration on the front cover then cut another and snipped out various words which I used to decorate the pages in the planner.  I will be making another one of these for myself for Christmas, I love having everything written down so I don’t forget anything.

The Ornamental Baubles die can be found here

The Christmas Greetings die can be found here


Friday, 2 August 2019

First Design Team Allocation


Above are a selection of the cards I made for my first allocation as part of Crafter’s Companion Design Team.  I just love these dies from the Fancy Nesting Dies range.  I used the Torn Edge Oval, Torn Edge Square and Torn Edge Circles Nesting die sets to make a selection of cards in different styles, including easel cards, dome cards, shaker cards, fancy fold cards etc.  I loved working with these dies as there are endless things you can do with them and they layer right down to a tiny centre die.  All the cards are decorated with a range of Crafter’s Companion paper pads, dies and stamps.

The range of Nesting dies can be found here:
https://www.crafterscompanion.co.uk/catalogsearch/result/?q=gemini%20nesting%20dies

Wednesday, 8 May 2019

Crafter’s Companion Design Team

I found out recently that I had been selected to join the 2019 Design Team for Crafter’s Companion.  To say I am overwhelmed is an understatement, I am in shock.  Although I have been making cards and other papercraft items for a long time I have never though my work was good enough to be on a design team.  I feel so honoured to have been chosen and look forward to making all kinds of projects using the stunning products from Crafter’s Companion.

This is a card I made incorporating a range of Crafter’s Companion products.  The cardstock is Centura Pearl in various shades of purple and silver and the embossing folder is called Geometric Roses.  The cute stamp is called Rabbit’s Garden and I coloured it with Triblend markers and the die is the Happy Birthday Circle die.  I coloured the background using Harmony Water Reactive inkpads in Crushed Velvet and Pink Tulip.

Thursday, 11 April 2019

Mother’s Day 2


I made this card for my mother for Mother’s Day.  I used papers from Tonic Studios monthly kit and their Butterfly Mosaic die set.  I cut out the daisy from the central die, sticking it onto white cardstock and hand cutting around the edges to make the individual flowers.  I filled the centre of the daisies with Dandelion Yellow Nuvo Drops from Tonic Studios which are self-levelling so I used lots to make the centre 3D .  I mounted some of the daisies on to foam pads to lift them up, adding some dimension then added some tiny butterflies and a bow.  

Sunday, 17 March 2019

Mother’s Day Card One


Mother’s Day is fast approaching here in the UK.  The above card is for my mother-in-law who loves everything butterflies.  The base card I made using a Tattered Lace Stepper Card die and the patterned papers I cut the decorative panels and butterflies from are from the stunning Roaring Twenties paper pad from Crafters Companion.  The butterflies are cut using the Butterfly Beauty die by Sheena Douglas and I cut it three times in different papers and layered them up so the wings stand out.  I love adding glitter to embellishments so I added glue in various places on the butterflies then dropped the die cut  into my glitter box.  I have added a few ferns behind the butterflies so they have something to rest on  and a few Tonic Nuvo Drops here and there to break the ferns up.  That is one card down, now I need to get my thinking cap on and get cracking on a card for my mum.

Saturday, 16 March 2019

Spinning Monkey Jungle Card


I made this fun card for my daughter to give to her boyfriend.  He is car mad so I used a safari jeep type car on both the front and inside with an assortment of jungle animals to complete the theme.  The monkey is attached to the aperture with white sewing cotton and the monkey wound up before closing so it spins when opened.  All the jungle dies are from Elizabeth Crafts Design.

Sunday, 24 February 2019


Today I intended to spent a few hours tidying my craft room but I came across this little ballerina bear topper that I made a while back.  The tidying stopped and I found myself inspired to make this card for a friend’s ballet mad daughter.  I used a Crafters Companion Gemini Create a Card Cut On Edge die to cut the design into the card blank then added some Fuchsia Centura Pearl cardstock behind the design.  I added a strip of the cardstock with a piece of ribbon and bow attached and a birthday greeting in co-ordinating colours.  I love the design of the Cut on the Edge die, it is so pretty.


Saturday, 23 February 2019

It’s Gin Time


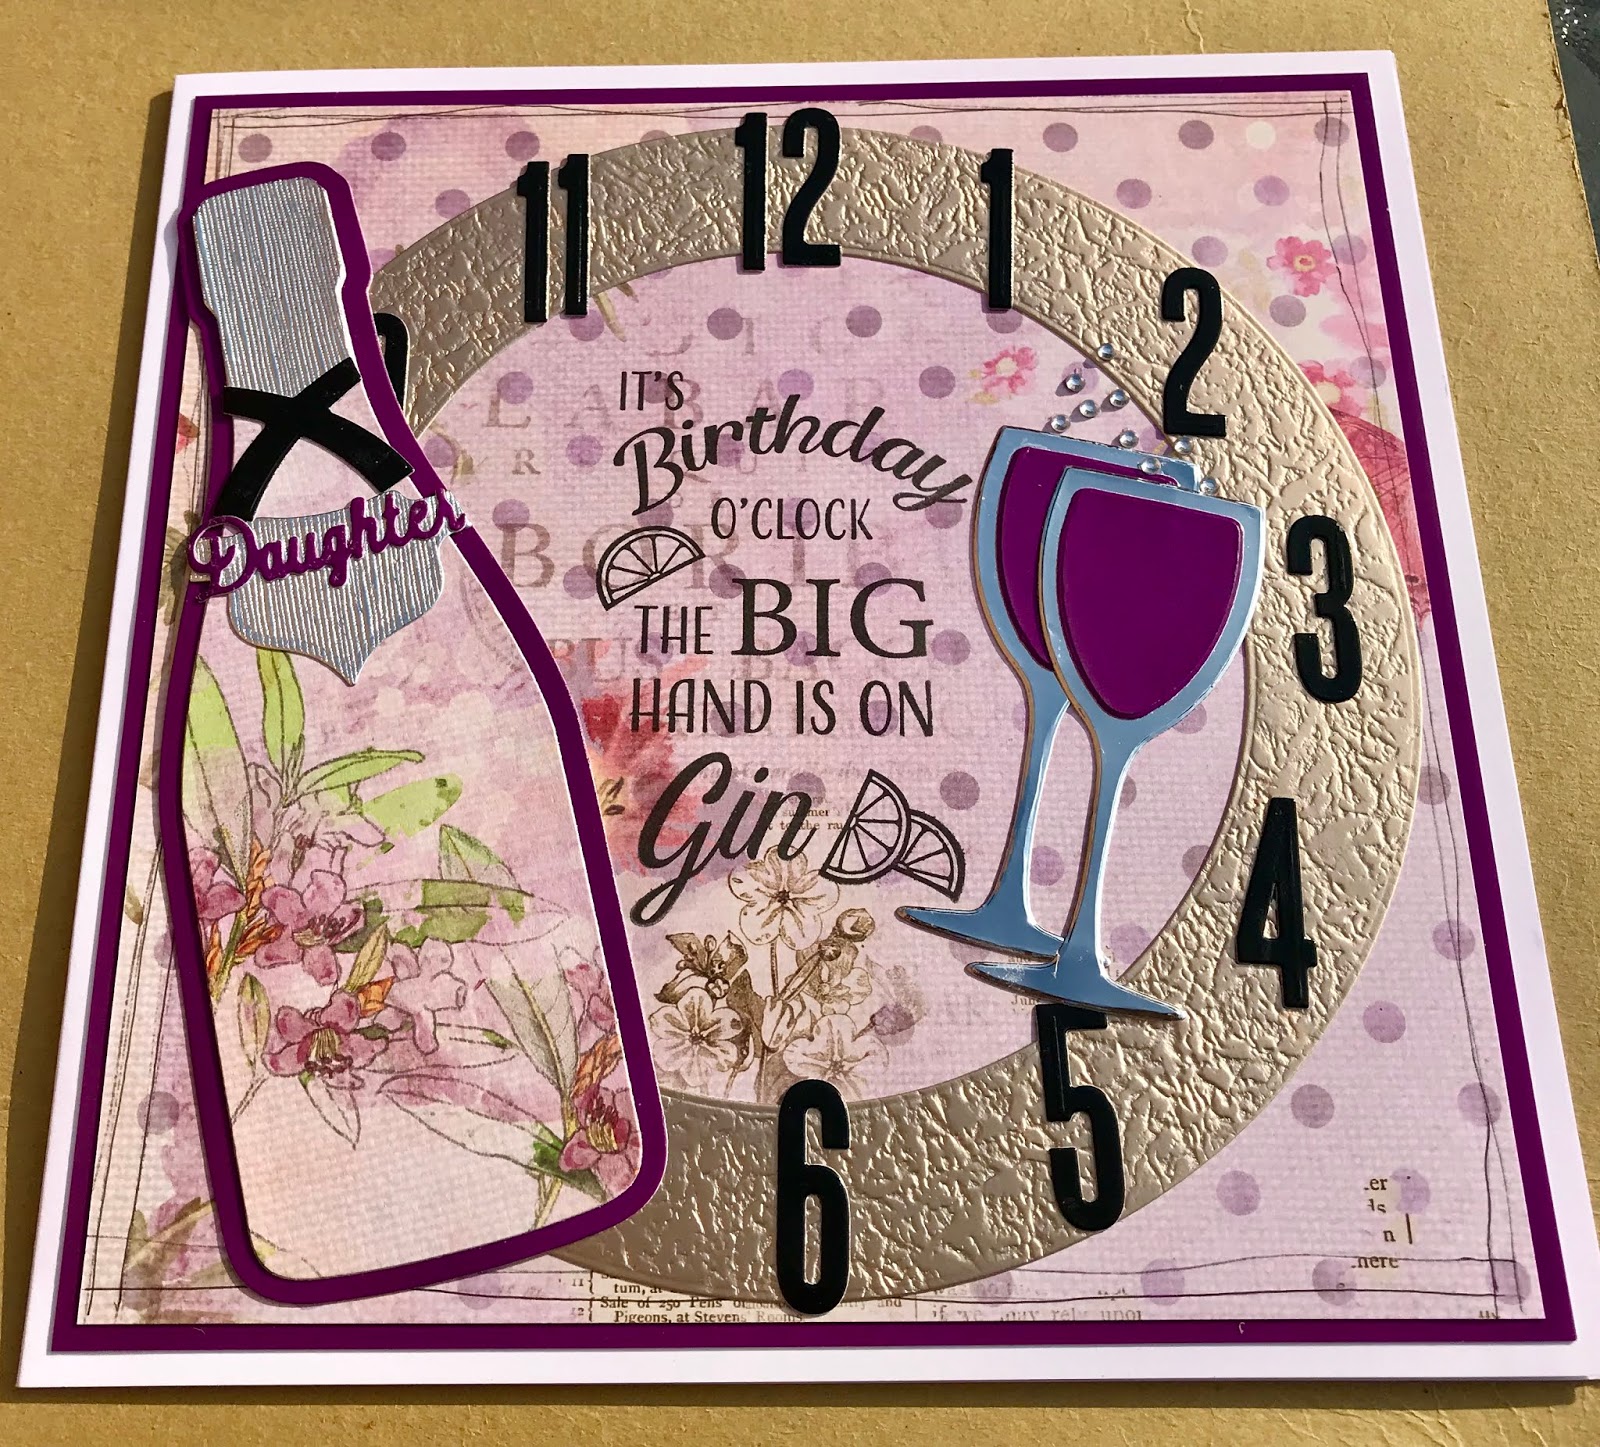
It’s my daughter’s birthday this week and I noticed an early birthday present in her kitchen, a bottle of purple coloured violet gin.  That gave me the idea to make this gin inspired birthday card for her.  I used the gorgeous papers from Crafters Companion Roaring Twenties collection and a stamp from the Quirky Prosecco range of stamps which are so much fun to use.  The bottle is made using Tonic’s A Good Year die set and the glasses are some generic dies I have purchased at some point.  Inside I have used another stamp from crafter’s Companion’s Quirky Prosecco range, it says “I am smiling because you are my daughter, I am laughing because there is nothing you can do about it”.  I hope she likes it.

Wednesday, 13 February 2019

A Few Recent Cards


It has been a while since I have posted on here so I thought I would post a few of my recent projects as a catch up.  I have been enjoying using dies and other products from a range of different companies recently but I think my style is still fun/quirky and my favourite technique is definitely still die cutting.  I don’t seem to have done much scrapbooking for a while as my printer has been down but that is certainly something I want to reconnect with.

Friday, 5 August 2016

A Very Happy Meal


This layout shows my hubby tucking into a huge Big Tasty meal at McDonalds following a trip to the cinema.  The smug smile is because I was dieting and, whilst he tucked into his heart attack in a bun, I was nibbling on four chicken nuggets with some sweet and sour sauce.  

The whole layout is made up of leftovers.  The patterned papers were leftovers from a kit that I wanted to get rid of as my scraps bag is overflowing.  The strips are positioned to make it look like more paper was used than actually was.  The bear die cut came from a bag of assorted dressed up bears that has been knocking about in my craft room for ages and as hubby collects bears I thought it was ideal for the layout and it represents Ronald McDonald in bear form!  I finished the layout off with some enamel dots, wooden stars, arrows and hearts (one heart I painted red for contrast) and some coloured strips with text on.   The thought bubble was my best find as it fits in both colour wise and theme wise.  I die cut the main part of the title using my little Diamondpress cutter which I love cos it is so portable and the rest was made up of left over alpha stickers mounted on foam pads.

Saturday, 30 August 2014

Crazy Twin Card


My brother Richard (Ricky) and I were both born in September, me at the end of September one year and him at the beginning of September the following year so for 25 days each September we are the same age.  Both in our forties now I still drive my brother mad for most of September by constantly referring to him as my twin brother and he always gets a birthday card from me to start the teasing off.  This year I wanted to use the gorgeous Poppy the Owl die along with the Lorna Label pop up die and the Clock & Gears die set, all designed by the wonderful Karen Burniston for Elizabeth Crafts.  I wanted the front of,the card to be a bit boring so I just used some scraps of Graphic 45 Botanical Tea papers from my scraps bag and typed and printed some text and die cut it into a label for the front.  I added some stars from a banner die I bought recently and left it at that.  The inside I wanted to be vibrant and funny and it had to relate to twins and 25 days.  I hope with the combination of more scraps of Botanical Tea papers and the die cuts I achieved my aim. 

The two text labels go something like this...

Happy Birthday Brother, this year I thought I'd drop the silly "twins for 25 days" routine....

.....but where's the fun in that!!  Happy birthday twin brother, lots of love from your TWIN sister .....blah blah.

 I hope this puts a smile on his face when it pops through his letter box shortly.  Let the teasing commence.


My Little Tree


Over the few months I have been making a few Christmas cards so I don't have the usual last minute rush to make lots which usually results in me cheating and buying a couple of boxes of cards instead.
This stamp is one of my favourite Christmas stamps from Lili of the Valley called My Little Tree.  I have bought a lot of the new Christmas stamps from Lili of the Valley recently and I am in the process of colouring them with my Promarkers but I had this slightly older image already coloured so I thought I would use it on this card. 
 
The base card was cut using the Elizabeth Crafts Evergreen Pivot Card die designed by my favourite American designer Karen Burniston.  This die cuts the three trees that pivot and also comes with some decorator dies that cut the slightly smaller trees and baubles etc. separately.  Here I have covered a piece of white cardstock with a large strip of double sided carpet tape, run the cardstock and dies through my Big Shot then removed the backing paper from the carpet tape and dunked the trees in Crystal Glamour Dust.  I also cut the tree background strips at the bottom using another Elizabeth Crafts die called Outdoor Edges and added Glamour Dust in the same way.  I cut two strips of white cardstock to go inside the card and one for the front and embossed two strips with a snowflake embossing folder and attached one to the left inside edge and one to the front right hand edge and left the right hand inside strip plain so I can write on it.  The tartan background papers are from an 8 x 8 paper pad from Lili of the Valley called Classic Christmas and the funky Christmas phrases on the front and inside are from the Christmas Wishes stamp set also from Lili of the Valley.  That's one down, only another 99 to go.


Monday, 4 August 2014

Poppy The Owl


I have fallen in love with the new wafer thin Karen Burniston dies from Elizabeth Crafts.  This card is made with a combination of her dies.  The base I cut using one of her old Sizzix Pop n Cut dies, the pop up part in the middle is her new Lorna Label die which creates a 3D step and a 3D label above it.  Poppy the owl is another of her brand new dies and the glasses are part of another of her new sets, Props 1, which has glasses, a bowler hat, moustache, lips, and dicky bow.  I love that each of the pop it up dies comes with lots of lots of decorator dies.  The Lorna Label has lots of smaller label dies, a banner and a speach bubble.  The Happy Birthday die is by Tonic and I can't remember what make the banner die is.  The papers on the card are leftovers from a Graphic 45, Botanical Tea paper pad.

Saturday, 17 May 2014

Lili of the Valley Mad!

I went to the Lili of the Valley's 10th birthday open day last weekend and snapped up the ten new fairy stamps and I love every one of them.  I think this one, called Water Lily is my favourite.  I made this card for one of my friends using some small pieces of leftover card and paper and to get as much out of the small piece of pink cardstock I cut the large circular piece out of the square piece at the back and the circle and flowers also out of the square piece at the back and the hidden part of the large circle piece behind the coloured image. It was a bit touch and go and I thought I wouldn't have quite enough but it just worked out.


The card below is a slightly older Lili of the Valley stamp called Vegetable Patch and it's very apt for another friend who, along with his wife and son, loves growing veg.  I cut the image on a little slope to make it look like he was working a little bit harder.  The papers I used are again just scrappy bits left over from other projects.  The On Your Birthday image on both cards is from set 7 Sentiments, also from Lili of the Valley and I coloured the main images with Pro-markers and Prismacolour pencils.


Had a bit of a tidy up of my Lili of the Valley stamps this week and found I have 253 of their individual stamps plus lots of their clear background and sentiment sets, tickets, Chinese ladies etc, eek, how did that happen?


Friday, 21 March 2014

Big Heart for Mother's Day

It's Mother's Day shortly and this year my Mother is away abroad with my Dad, enjoying the sunshine so I made her card in December so she could take it with her when they flew out in January.  The card above I made for my lovely Mother In Law.  She loves my hand made cards and keeps them all in a big box.  She went mad the year I presented her with a gorgeous and very expensive shop bought one, I had to go home and make her another one so that year she had two.  I have used my favourite ever Lili of the Valley Stamp called James - Big Heart.  I keep using this stamp over and over, James is so cute.  Here I have coloured him with Pro-markers, added some liquid pearl dots to the heart and added the image to a die cut frame, I think it's a Sizzix one.  I have layered up some patterned papers from my scraps bag with some red cardstock, added some red ribbon tied with a bow then die cut some flowers and leaves, curling up the edges before inking around the edges and then I have added a half pearl to the centre of each flower.  I finished it off with a little sentiment and a couple of smaller pearls.

The inspiration for this card came from the monthly challenge over on the Lili of the Valley blog.  This month it is a crafty bingo challenge, with a 3 x 3 square grid, each grid containing the name of a type of embellishment and you have to create a card using a line from the grid, I chose the top line which was ribbon, pearls and flowers.