What's In A Title?

The blog title is my take on my favourite quote from Stephenie Meyer's Twilight novel, when Bella realises she is in love with vampire Edward. My version is slightly less impressive than that in the book but never the less true:


"About three things I was absolutely positive, first I was an obsessed crafter, second, there was a part of me - and I didn't know how potent that part might be, that thirsted for beautiful craft materials, dies, stamps, papers, cardstock etc, and third, I was unconditionally and irrevocably in love with scrapbooking and cardmaking"


Sunday 9 December 2012

Christmas Cards 2013

Been busy the last couple of weeks, colouring in stamped images, then adding glitter glue and today I had one final card making session.  Hubby knew not to disturb me, he just poked a McDonalds bag & drink around my craft room door at lunchtime.  Managed to make the last twelve cards for family and friends, four are shown above.  Been going mad with the plasterers tape I bought a few weeks back, (£4.95 from B & Q for a huge, huge roll), it's the white meshy stuff you can see on the above cards.   Rather than trying to come up with lots of different designs this year I just stuck to one basic design and went mad with the Lili of the Valley stamps and glitter glue.  The papers are Bo Bunny and have tons of glitter on but due to the poor winter lighting its difficult to see the sparkle.

These are the tiny easel cards I made in July for my workmates, felt good to give them out last week without having the stress of making them all first.  Again I stuck to a basic format for them, most have stamped background papers but on some I used red dotty paper.  These were all made using Stampin' Up! products.


Wednesday 7 November 2012

Baby Album - Bathtime Giggles

Another page from the baby album, this is of JR at bathtime.  I stamped lots of bubbles then hand cut them all out then added them is layers around the semi circle of patterned paper.  I printed the duck and the bottle of baby bath off of t'internet and added a label to cover the bottle.  The photo is hiding a pull up tag for some journalling.

Monday 5 November 2012

Baby Album - Hello World

Our friends had their first baby in June this year and asked me if I would do a scrapbook page every month to record how much he changes and develops month by month.  I jumped at the chance as it gives me an opportunity to scrap something other than my daughter or my husband and I've never really had to scrap anything for boys or babies as my daughter was in her teens when I discovered scrapbooking, althought I have done a couple of layouts of some of her baby photos.

For the first page in the album I used these papers and accessories which have been hanging around in my craft room for a long time so it's nice to have used some of them at last.  I think they are possibly Bo Bunny's Ad Hoc range but I'm not sure. The mount behind the photo is hiding a slide out tag so that the proud parents can journal their thoughts and feelings about his arrival into the world.   The photo is of JR at just 37 minutes old, bless, he looks so worldly wise already.

Sunday 21 October 2012

Happy Birthday To Me - Again

Over a month now since I blogged.  Been so busy doing the photography at a friends wedding then making samples for my friend Caroline's Stampin Up party using some of the items from the new seasonal Stampin Up catalogue then two scorching hot weeks in Cyprus.  It was my birthday whilst we were away so I got a few presents before we went abroad but mainly I got gifts of money.  I saved it and saved it until last weekend when I ordered a few items from the brand new 2012 to 2013 Stampin Up catalogue.  When I say a few I really mean alot, I got fourteen stamps sets and two jumbo stamp wheels, several punches, lots of Sizzix dies, a couple of packs of patterned paper and cardstock and the super lush doctors bag which is supposed to house the Sizzix Big Shot machine but it currently full of all my new stuff.  I also pre-ordered the new Ebosser machine, not from Stampin Up, which I should receive mid November.  So it seems like I have had lots of birthdays this year and still the Ebosser pressie to come.

This is the first set I've used from my new stash, the Happy Hour set, which as you can see has lots of stamps (17), the text stamps cover birthdays, thanks and Christmas and it is a really, really cute set.  I made this little card from some left over scraps of paper I had on my craft desk.  It's just a quick, simple card, perfect for work as we all swap little cards so I need about thirty per year.

Thursday 13 September 2012

Perfectly Preserved Samples


I have almost finished making a range of samples for Caroline to display at a Stampin' Up! party in October.  I have two partly made cards to finish and that's it, I need to move onto something else.  I love how versatile the stamp set, dies and gorgeous co-ordinating papers are.  I've made a few birthday cards and gift bags, a Valentine's card, Christmas card and gift box, a jar full of jelly beans (from Julie's training night) and a mini handbag.  I've also bought some big fancy glass jars and I'm going to decorate them and give them as Christmas gifts rather than buying shop bought stuff.

Sunday 9 September 2012

Wonderful Winterland Cards


Caroline has gone off on her jollies so whilst she is away I said I'd make her some samples for an upcoming Stampin' Up! party.  I love the Wonderful Winterland stamps from the new seasonal Stampin' Up! catalogue so I had to play with these first.  I stamped and coloured the two images on the cards above.  On both cards I stamped the snowflake background using a Pool Party stamp pad and the Sparkling jumbo roller wheel and the gorgeous papers are Candlelight Christmas Speciality Designer papers.  On the top card I also used another jumbo roller (love these), this time the Jolly Jingles one to make the decorative strip and I stamped the image in Real Red.  The large snowflake behind the little image is one of the stamps from the new Snowflake Soiree stamp set and I stamped onto real red cardstock then used white embossing powder.  On the second card I stamped and cut the jar using the Perfectly Preserved stamp set and matching Framelits Dies, a bargain if you buy the bundle at the discounted price.  I added some glitter adhesive to the bottom of the jar and stuck the ice skating girl onto the jar on dimensional pads.  The stunning ribbon is the new Stitched Satin Ribbon in gumball green with a Designer Ribbon Slide added.  The greeting is stamped using one of the stamps from the Petite Pairs set I used the Large Oval and Scallop Oval punches.

Wednesday 5 September 2012

Everyone Seems to Have Birthdays in September

I coloured this lovely Humphrey's Corner stamped image last week using my
Pro-markers and Prismacolour pencils and blended the pencils with Sansodor before adding some stickles.  I was really pleased with the shading of the dress, I don't use orange colours much, I usually go for pinks and purples but I certainly think I will be using them again.  Today my Mum rang to say that my Dad and her were on their way to my house and should be there in about 20 minutes.  The coloured image was intended for her birthday card but I'd not got any further with it than the colouring so I grabbed some papers and ribbons and started making up the card using some Stampin' Up! cardstock in two different shades of orange to go with the dress and some lovely papers that my good friend Kathy gave me a couple of weeks ago.  My Mum likes a card with a nice verse in it so I couldn't use my usual "Happy Birthday" insert, oh no, that would have been far too easy!  I went onto the internet and googled Mothers Birthday Verses and found a nice copyright free verse and copied that into Word, rushed downstairs and printed the insert out, rushed back upstairs, cut it to size and scalloped the edges before gluing it in place.  Finished the card and insert in about ten minutes and then my parents didn't turn up for several hours - typical! 

This card I made for my "twin" brother who for 25 days every September is the same age as me and then at the end of the month I have my birthday and he becomes my little brother again.  This is another Humphrey's Corner stamped image, coloured again with Pro-markers, Prismacolour pencils, blended with Sansodor and then tons of stickles were added to the dots on the clown's pants and the flower on his hat.

Tuesday 28 August 2012

Hands Off My Bear


This is another layout using the same template as yesterday's layout but I have mirrored the image to have the photos on the left instead of the right.  The photo is of my hubby Phil (aka Mr Grumpy) with our friends gorgeous baby, James.  Phil collects teddy bears so when he saw James's teddy he made a grab for it and wouldn't put it down.  Don't think baby James was too pleased.

Monday 27 August 2012

Everybody Loves Kathy

My lovely friend Kathy has been following Shimelle Laine's "And Now For Something Completely Different" class on UK Scrappers since the beginning of this year and I recently saw a lovely layout she had done using the instructions for the May project.  I really liked the position of the papers so I decided to have a go myself so I grabbed some photos of Kathy at the Scrapstars Retreat in April (well why not feature Kathy?) some green mist for the splodges, my favourite white textured cardstock and then went through my stash box in search of some suitable papers.  I found these papers by My Little Shoebox, called Garden Party and thought they went well with the tops Kathy is wearing in the photos.  I hand cut some flowers from the papers and punches some bumble bees and hearts.  As usual, the Thickers I decided chose had alot of letters missing to I had to inprovise with the "a" and the "t" but I think they look okay.  I like the feel of the page so much I am now on with another layout, flipping the positioning of the design to the left hand side to make a page for the baby album I am doing for my friend to document her gorgeous son's first year.

Wednesday 22 August 2012

Parents On The Run

 
Today I spent my day off lugging heavy boxes out of the back of a removals van into my parents new bungalow.  They spent years planning the big move to the seaside when they retired and now they have moved back to the big, bad city, arriving just as the last box came off the van!!!  I used a printed image from Lili of the Valley, I know, it's lazy not to use the stamp I bought but I haven't had time to colour much recently.  The papers are random sheets I found in my stash box when I was giving it it's annual tidy out.  The flowers I made myself and the leafy bits and label were punched using the Stampin' Up! Build A Bird punch.  Because of the flowers standing proud of the card I had to make a envelobox to put it in too.

Saturday 18 August 2012

Shoe Box Day

Today I attended a Shoe Box Day in Pudsey, organised by the lovely Julie, my S.U. Grandma, where about twenty Stampin' Up! Demonstrators came together for a day of fun and crafting.  Each person made a project such as a card, scrapbook page, box, etc in advance, from current or new Stampin' Up! products and made up kits for nine other demonstrators.  We started about 10am and passed our project box to the person to our left so everyone had a different project to work on for about 30 minutes and the project boxes went around the table to each person in turn until everyone had done them all. We had an amazing buffet lunch, so much choice and the most amazing cupcakes.

I made 10 projects, as shown above, which include a lovely Halloween goody bag, complete with clear mints and liquorice, some sweet little crackers filled with choccies, a little gift box, a cute square gift box with a little gift card holder inside, five fantastic cards and an amazing double eisel card.  My project was a 5 3/4 " square scrapbook page themed around love, using the Artistic Etchings stamp set.   Caroline's project was a gorgeous card where you stamped a stunning background and spritzed it and added some musical scores using the Stampin' Round tool, a new addiction of mine. I love all the projects and it was fabulous doing so many different things and surprisingly nobody brought anything that was similar to any of the other projects.  Huge thank you to Julie for organising such an inspiring day.

Friday 10 August 2012

I Am The Gift Bag Lady - LOL!!!

Have I got it bad or what?  A couple of weeks ago I discovered the instructions to make these lovely little gift bags and since then I have made about a dozen of them.  I made these three today using some odd sheets of patterned paper from my stash box and the gorgeous "Posy Trio" stamp set from Lili of the Valley.  These bears are simply stunning and I love the way they overlap the circle around them.  As usual I coloured them with Pro-markers and added lots of glitter.  They are great to give as gifts, filled with lovely choccies.

Wednesday 1 August 2012

More Cards


Been a bit stressed this week with the redundancy process starting at work so I have tried to reduce the stress during my evenings off by relaxing with some stamped images and my box of pro-marker pens.  Both cards are made using stamps by Lili of the Valley and the papers are from my scraps box.  I coloured the cupcakes then put glitter on some of the icing and I put Glossy Accents over the top of the chocolate icing.  For the flowers I punched circles and cut spirals into them then wound them up with my quilling tool and punched leaves using Stampin Up punches.

Wednesday 25 July 2012

British Grand Prix 2012

Today was such a perfect day..... no I'm not going to break into song, honest.  I was home alone, it was quiet and peaceful so I did a bit of housework and then flitted in and out of my craft room all day, bliss.  Today I completed this layout about our weekend at the British Grand Prix a couple of weeks back.  I used a kit I got for a cyber crop recently but didn't get around to using.  I thought the flags would emphasize that the grand prix was British and the grid paper would be perfect to blend in with the envelope that our tickets came in as that has a grid effect on the front and I think it looks great as it has a McLaren driver on the front, our favouite team.  Once I'd stuck the ticket envelope down there wasn't a great deal of room for photos so I made the curved shape, a bit like a race track and added a few photos.  I added some journalling and I was then left looking at the empty space in the bottom corner which was quite ugly and definately needed something to fill it.  I decided that it would be fun to add some printed images of stills from the McLaren Animation cartoons that are being played in the run up to each grand prix.  I love how they have made Jenson (drool) look like a surfer dude and Lewis looks about twelve!  They filled the gap nicely and finished off the layout.

Sunday 22 July 2012

Enchanted Bunny

I made this fun card today using a pre-printed bunny image from Craftwork Cards that I found at the bottom of a drawer in my craft room and the lovely Everyday Enchantment papers from Stampin' Up! that have been re-released again recently along with the new Everyday Enchantment ribbon and brad.  The flower was cut from a Sizzix Sizzlet die that I acquired recently.  The scalloped circle is cut from Island Indigo cardstock using the Scalloped Circle Bigz Die and the four lots of patterned papers are edged with the same colour ink.  The text is stamped in Calypso Coral ink using a stamp from the Tiny Tags stamp set and the Cupcake stamp set and the Tiny Tag and Modern Label punch.

Sunday 1 July 2012

Mad Cardmaking Session

Found a pack of Tatty Teddy papers and chipboard cutouts yesterday whilst looking through my stash and as my stock of cards for my workmates' birthdays is a bit low I thought I would have a mad card making session.  These are the twelve little cards I made, I think they are 4" x 4" card blanks, a few bits of paper and the chipboard cutouts.  I stamped "Happy Birthday" on each with a stamp from my ever expanding collection of Stampin' Up! stamp sets and a greeting on the inside from another Stampin' Up! set.  That should keep me going for a while.

Sunday 24 June 2012

ATDML Cybercrop Layout 2

As mentioned on yesterday's post, I have been doing the weekend cybercrop on A Trip Down Memory Lane's website, well trying anyway, my family and housework have seriously eaten into my spare time, as usual.  This is my version of the class by Karen Moss.  I have used a lovely kit I got in my goodie bag at the Scrapstars Retreat in April, it's the Bella, Bella range by My Mind's Eye.  I used the supplied templates to make the joined up hearts at the bottom but cut the top one up so the big heart didn't obsure the photo of my great-nephew Maison.  His poor cheeks were red raw as he was teething and with his big blue eyes shining it made him look so cute.  The strip of paper down the side of the photo was a tad wobbly so I have peeled it off and repositioned it so it is straight but I couldn't be bothered to take another photo.  Right, off to start another of the classes, three down so far, just another nine to go!!!

Friday 22 June 2012

A Trip Down Memory Lane Cybercrop

This weekend A Trip Down Memory Lane are doing a cybercrop and this is my version of the first class class by Mel Hand.  I have used papers from Echo Park's "For The Record" collection.  Sorry it's slightly blurred, there is no day light as it's almost 10pm and the artificial light is rubbish for taking photographs in.

Wednesday 20 June 2012

Happy Birthday Caroline

Today I gave Caroline her birthday card as I won't be seeing her on Friday which is the "big day".  I made it using the Stampin' Up! Twitterpatted papers from the Summer mini catalogue and one of the Lili of the Valley stamps which I coloured with Pro-markers and lots of glitter.  The flowers I made myself from punched circles, twirled up and glued into bases punched with small flower punches.  She seemed to like it so I am happy.  Next card I will be making will be a birth card for some friends who are currently at the hospital having their first baby, I am so excited.  I want to get cracking on the card but don't know the sex of the baby yet so I will have to wait.  I have punched and coloured lots of cute baby themed images, two of each image, one blue and one pink.

Saturday 16 June 2012

Happy Birthday Dad

I made this card for my Dad's birthday this week, I stamped the background using the Stampin' Up! Spiced Paisley stamp set and some Brights ink pads.  I also made a card for Caroline's birthday but I can't put a picture on here as she might see it before the big day.

Wednesday 6 June 2012

Today's Craft Day


Today we had a little craft day, four friends crafting, eating buns and cake and having a lovely time together.  We started off with a little handbag gift bag using a pattern from the wonderful Kadoosjes magazine given to me by the wonderful and very talented Jolan Meurs. We used a variety of Stampin' Up! papers and cardstock so there was a lovely selection of colours.  Caroline taught Theresa how to cut a rough circle and roll it into a flower and she went mad making lots of different sized flowers, next thing we knew she had added flowers and handcut leaves to the bottom of her handbag (see top photo) and it looked amazing, much better than ours so we will all be adding flowers and leaves shortly! 

We then moved on to making a six sided box (see yesterday's post) using the Stampin' Up! mini milk carton die and sticking two pieces together, forming it into a box and decorating the sides with patterned papers before tying the top off with Pool Party Seam Binding.  I used some of the new Twitterpated papers on Caroline's so she can use it for a display sample to show off the lovely papers in the new Summer mini. 

We had a lovely lunch, lots of assorted sarnies and Kathy's amazing choccy cupcakes and cake.  After lunch we made an awning card, Caroline made hers into a flower shop using my favourite Bright Blossoms stamp set and we made cupcake shops using the Cupcake stamp set and matching punch.  We rounded off the day with a card using papers from the Nursery Nest paper range, some lovely Wisteria Wonder and Crumb Cake cardstock and the Labels Framelets from the new Summer Mini, ruffled ribbon and stamps from the Bright Blossoms stamp set again and one of the Designer Frames embossing  folder.  Everyone got lots of practise using the Stamp-a-ma-jig, that was interesting!!!!

Tuesday 5 June 2012

Craft Day


Today I prepared some kits for a little craft day four of us are having tomorrow.  We are making a little handbag, a six sided Christmas themed box and a little card using the Bright Blossoms stamp set from Stampin' Up! that I am totally blown away by at the moment.  After I finished cutting and packing kits and supplies I made the awning card at the top, using instructions I found on Youtube and using the ........you guessed it Bright Blossoms stamp set and my Stamp -a-ma-jig to position the vases on the shelf in a straight line, love that little tool, it is soooo useful.  I raised the tulips up on foam pads to give the items on "the shelf" a bit more dimension.  The little orange squiggle at the bottom of the card isn't a smudge, it's my finger.  Apologies for the slightly blurry photos, used my phone instead of my proper camera.

Monday 4 June 2012

Card Samples


I celebrated the Jubilee on Saturday at Julie's Jubilee Jamboree in Pudsey.  I went with Caroline and over the three hours we made some lovely jubilee bunting and a couple of amazing cards.  I won the raffle (I know, again!!) and had a choice of some lovely prizes.  I decided on the Bright Blossoms stamp set from the Stampin' Up! Summer Mini and today I made these cards, three of which feature the little flowers and vases from the Bright Blossoms set.  The stamps are lovely as they are small and very cute and fit inside many of the Stampin' Up! punches, embossing frames and the labels framelets.  The bike is part of the hostess only set Pedal Presents from the Summer Mini.  It is a lovely set as you can stamp items into or onto the basket, flowers, cake, balloon, presents, hearts and a little bird.  I coloured the balloons in then added some clear glitter glue over the top to make them sparkel.  The cards above are heading for Caroline's to go in her samples box for the next Stampin' Up! party.

Monday 28 May 2012

2012 Regional Training Day


I may already have mentioned that a couple of weeks back I attended a Stampin' Up! Regional Training Day at Weetwood Hall in Leeds.  The photograph in this layout was taken by the training ladies at the end of the event, using an i-phone, whilst standing on a chair on the stage.  It shows the seventy five Independant Stampin' Up! demonstrators that attended the day.  The layout was make with one of the three make and take kits provided on the day and a few extra bits and bobs from my S.U. stash and some of my S.U. punches.  Instructions on how to make the suggested layout were provided but being a mad scrapbooker I had to change it all and do it "My Way" which was the theme of the training event.  The papers are from the Twitterpated designer paper range from the Stampin' Up! Summer Mini brochure and the gorgeous ruffled ribbon and baker's twine can also be found in the Summer Mini.

Tuesday 22 May 2012

A Bag and A Box

I am still bouncing off the walls with inspiration from the Stampin' Up! Regional Training Day last Saturday.  In the photo is a little handbag I've seen a few times but never got around to making and a little box in the shape of a slice of cake.  The handbag is made from one sheet of 12" x 12" pink polka patterned paper from the Stampin' Up! Subtles Collection, one small piece of Wisteria Wonder cardstock, one small piece of Twitterpated designer paper, a small piece of ribbon and two velcro dots (not Stampin' Up!).  I die cut the Wisteria Wonder cardstock and Twitterpated paper using the Labels Collection Framelits Dies. 

The slice of cake box I made from a pattern in the wonderful Kadoosjes magazine, a copy of which I was given by the very lovely and very talented Jolanda Meurs.  I used the pink polka patterned paper from the Subtles collection again for the middle section of the cake and topped it with a piece of Twitterpated paper.  The white frills I punched from white cardstock using the Stampin' Up! Dotted Scallop Ribbon Border punch.  I punched a couple of circles and scalloped circles from the pink polka paper and the Twitterpated paper and cut them into spirals and then rolled them into flowers.

Saturday 19 May 2012

All At Sea


Today was Stampin' Up! Regional Training Day at Weetwood Hall, Leeds.  I collected Caroline and we arrived just before 10am.  We had been asked to bring along either a card front or a 6" x 6" scrapbook layout, made using products from the new Stampin' Up! Summer mini and other current products.  This layout was made using the gorgeous The Open Sea stamp set, some Linen Thread and crumb cake and very vanilla cardstock and stampin up classic stamp pads.  The title was made using letters I printed from Word and cut out and inked.  The photo is a tall ship that does cruises along the coast from Portimau in the Algarve.  The layouts or card fronts were stuck on a huge board in the conference room the event was held in and everyone took photos to use as inspiration. 

The training day was a mix of new product demonstrations and motivational talks about building your business, improving your sales, adding value and promoting your business.  We got a lovely free stamp set and three projects to make including a 12" x 12" scrapbook page and two cards.  At one point they read out the names of the newest and longest serving demonstrators in the room and apparently the newest  was me, how embarrassed was I?  Especially as we had been talking earlier to a lady who had only just become a demonstrator that week but was too late to register for the event but had been given a cancellation place so she deserved the round of applause and embarrassment, not me.  I hid my head in my hands and kept my head down near the table whilst everyone clapped, I was red for the next hour at least and Caroline was laughing her head off.  There were prizes given out and lucky me won a lovely set of papers from the next Summer mini, a full roll of ruffled ribbon, a pack of baker's twine and some Twitterpated material, which I might see if I can make into a lovely owl or two.  Lunch was a sandwich, crisps, chocolate, fruit and water and there were plenty of packets of biscuits around the room. 

A lot of the ladies did swaps of things they had designed, some card fronts, some tags, some little boxes and some little boxes with sweeties in.  I hadn't done any as I just didn't have the time, some ladies did seventy and some of the ladies who had spares were very kind and gave me one of theirs with just a thank you in return.  I met some lovely ladies there today and thoroughly enjoyed myself and soaked up lots of ideas and inspiration.


Friday 18 May 2012

Anniversary Card


Caroline, Kathy, Theresa and myself went to a colouring class at Lili of The Valley in Leeds a couple of weeks ago and spent an hour learning colouring and shading from the wonderful Bev Rochester.  I've been buying and colouring L.O.T.V. images for years so I was amazed how much I learnt about colouring.  I thought the class would just improve  what I already did but it was like starting from scratch.  We coloured with Pro-markers, blending colours almost seamlessly then used Prismacolour pencils to add highlights or lowlights to hair and clothing.  I loved it and can't wait for them to do another open weekend with classes so that I can do the 3 hour advanced class.  Whilst we were at the class we were offered 10% discount on any purchases so of course I had to buy one or two or fourteen of their stamps to practise with, well it would have been rude not to!  They also had a small selection of pro-markers so I bought a few more to add to my collection.  I have about one hundred L.O.T.V. stamps now, I love them all and they get lots of use. 

The anniversary card above I made over a few days, I stamped it one day, coloured it the next, glitter glued it the next and then made it into a card today.  I used some patterned papers from my stash, I think it's Kaisercraft and Stampin' Up! crumb cake card stock.  The text is from the Marry Me stamp set from Stampin' Up!  I used a Nestability die to cut the scalloped square and a tiny circle punch to punch white, pink and rose circles which I then cut into spirals and rolled up to make the flowers, the base of the flowers I punched using the Stampin' Up! Boho Blossom punch.  I added a little piece of self-adhesive lace which I rubbed a crumb cake ink pad over to make it look a little less white and a little more like antique lace.  Hope my friends like the card, I have considered buying them one and keeping this but I have already hinted I have made them one.

Wednesday 25 April 2012

Lida's Journey


I attended the wonderful Scrapstars Retreat in Leeds at the weekend and this amazing album was one of the classes by the very talented Lida De Witte from The Netherlands.  I was gob-smacked when I saw the little car and the road in the album, how she thinks these things up I will never know.  The middle part of the album is a fold-out page with a huge heart and smaller hearts and I couldn't resist punching a few hearts with my Stampin Up Hearts punch, well it would have been rude not to.  I have finished the album but I am going to have to think very carefully about what photos to include in it, I want it to contain very special photos.

Wednesday 11 April 2012

Go Team McLaren

Another day, another layout! This will be the last for this week I think, back to work tomorrow after having 8 craft filled days off. This layout is another using my Brights Collection Paper stack by Stampin' Up! Today I used the Real Red stripes and Pacific Point dots papers and the Scalloped Border punch for the white between the two coloured papers. The bunting was made using the Petite Pennants punch and tied up with Linen Thread and the hearts were made using both the Heart to Heart punch and the Full Heart punch. The frame around the photo was the left over part from the label I used on yesterday's cupcake layout and stamped using the Confetti stamp set. I cut the label using the new Framelits Dies called Labels Collection from the Summer Mini (available from 1st May 2012). The text I cut using the Alphabet Simple Letters dies.
The photo is courtesy of McLaren and features Jenson Button (phwoar) and Lewis Hamilton at a photoshoot in London. We are huge McLaren fans and during the Formula One season can be found glued to the TV on Saturday and Sundays watching qualifying and the race and we love going to live races too.

Tuesday 10 April 2012

I Dream of Cupcakes


Here is another layout using Stampin' Up! papers, this time from the Brights Collections 12" x 12" Paper Stack and I used the Regal Rose and Tempting Turquoise dots papers from the stack and from the matching A4 Smooth Cardstock pack I used the same colours. The cupcakes were stamped using the Create A Cupcake stamp set and punched out with the matching Cupcake Builder Punch, both from the Spring Mini catalogue which finishes at the end of April. The inks used throughout are from the Brights Collection and I cut the large letters for the title using the Alphabet Simple Dies which I absolutely love. I also used the Scallop Trim Border Punch to add a little bit of white in between the two strong paper colours to break it up a bit and added some gorgeous Pretty in Pink half inch Scallop Dots Ribbon. I mounted the cupcakes onto label shapes cut using the brand new, and exclusive to Stampin' Up!, Sizzix Framelits Labels Collection. There are six metal dies in the set, each progressively smaller than the other. The hearts background on the label was stamped with one of the stamps from the Confetti Stamp Set, which has six different stamps that can be used in so many diffferent ways, they are so versatile. To finish the whole thing off I used a photograph of my bessy mate Caroline, which was taken last July on a photography day out in Leeds, with the lovely Kirsty Wiseman and friends. Caroline loves cupcakes and does in fact dream of cupcakes.

Monday 9 April 2012

So Cute!


No posts for months and two in two days, how fickle am I? These gorgeous Nursery Nest papers are free from Stampin' Up! with any order over £45 during April 2012. I got these last week with my demonstrator pre-order from the new Summer Mini brochure which has some gorgeous stamps and dies etc in it. The little cutie in the photo is my niece's son, Maison, pronounced Mason but I think she got a bit confused when she registered his birth, thus ending up named after the French word for a house! I love Stampin' Up! owls, the punched ones and the ones on paper, it seems to have become an addiction. You might have guessed that as I have used lots of owls in my layouts and cards recently.

Sunday 8 April 2012

Heart Card


I saw this type of card in a cardmaking magazine in February and bought the magazine just for the instructions on making the base of the card. The one in the magazine had flowers and butterflies embellishing it but after purchasing two heart themed punches from Stampin' Up! I thought I'd make a heart one for my mother in law for Mother's Day. The lovely Julie, a fellow demonstrator, made a gorgeous version of this card with plain cardstock (crumb cake I think) and a few hearts but I wanted to decorate mine with papers and go really mad, overloading it with the heart embellishments. I used white cardstock for the base card and Stampin' Up!'s Everyday Enchantment Designer Papers mounted onto some red cardstock for the embellishments with the papers used to line the front facing sections of the card. The card was so chunky with all the heart embellishments and ribbon bow on it that I had to make a box to put it in so I used the same papers and a heart embellishment. My mother in law loved it and has kept it out as she said it was too pretty to put away.

Monday 12 March 2012

Cherish

This layout shows my daughter Louise at a photo shoot she did when she was about four years old, she's 19 now. She got to dress up in all kinds of costumes and I got a lovely series of photos, which were lost for many years but happily turned up again a couple of years ago. I used the gorgeous Beau Chateau patterned papers from Stampin' Up and tore and rolled an apperture in the paper then cut some of the patterned paper to create a frame on two sides of the apperture. I inked the papers with Stampin' Up ink and added ribbon and a flower made with the Fun Flowers Bigz Die, which I inked, scrunched up and finished off with an antique brad. I finished the layout off with three butterflies punched with the butterfly punch with some bling to decorate the body and used the label punch to add Louise's name and the year the photo was taken.

Wednesday 7 March 2012

Stampin' Up - Circa 1906

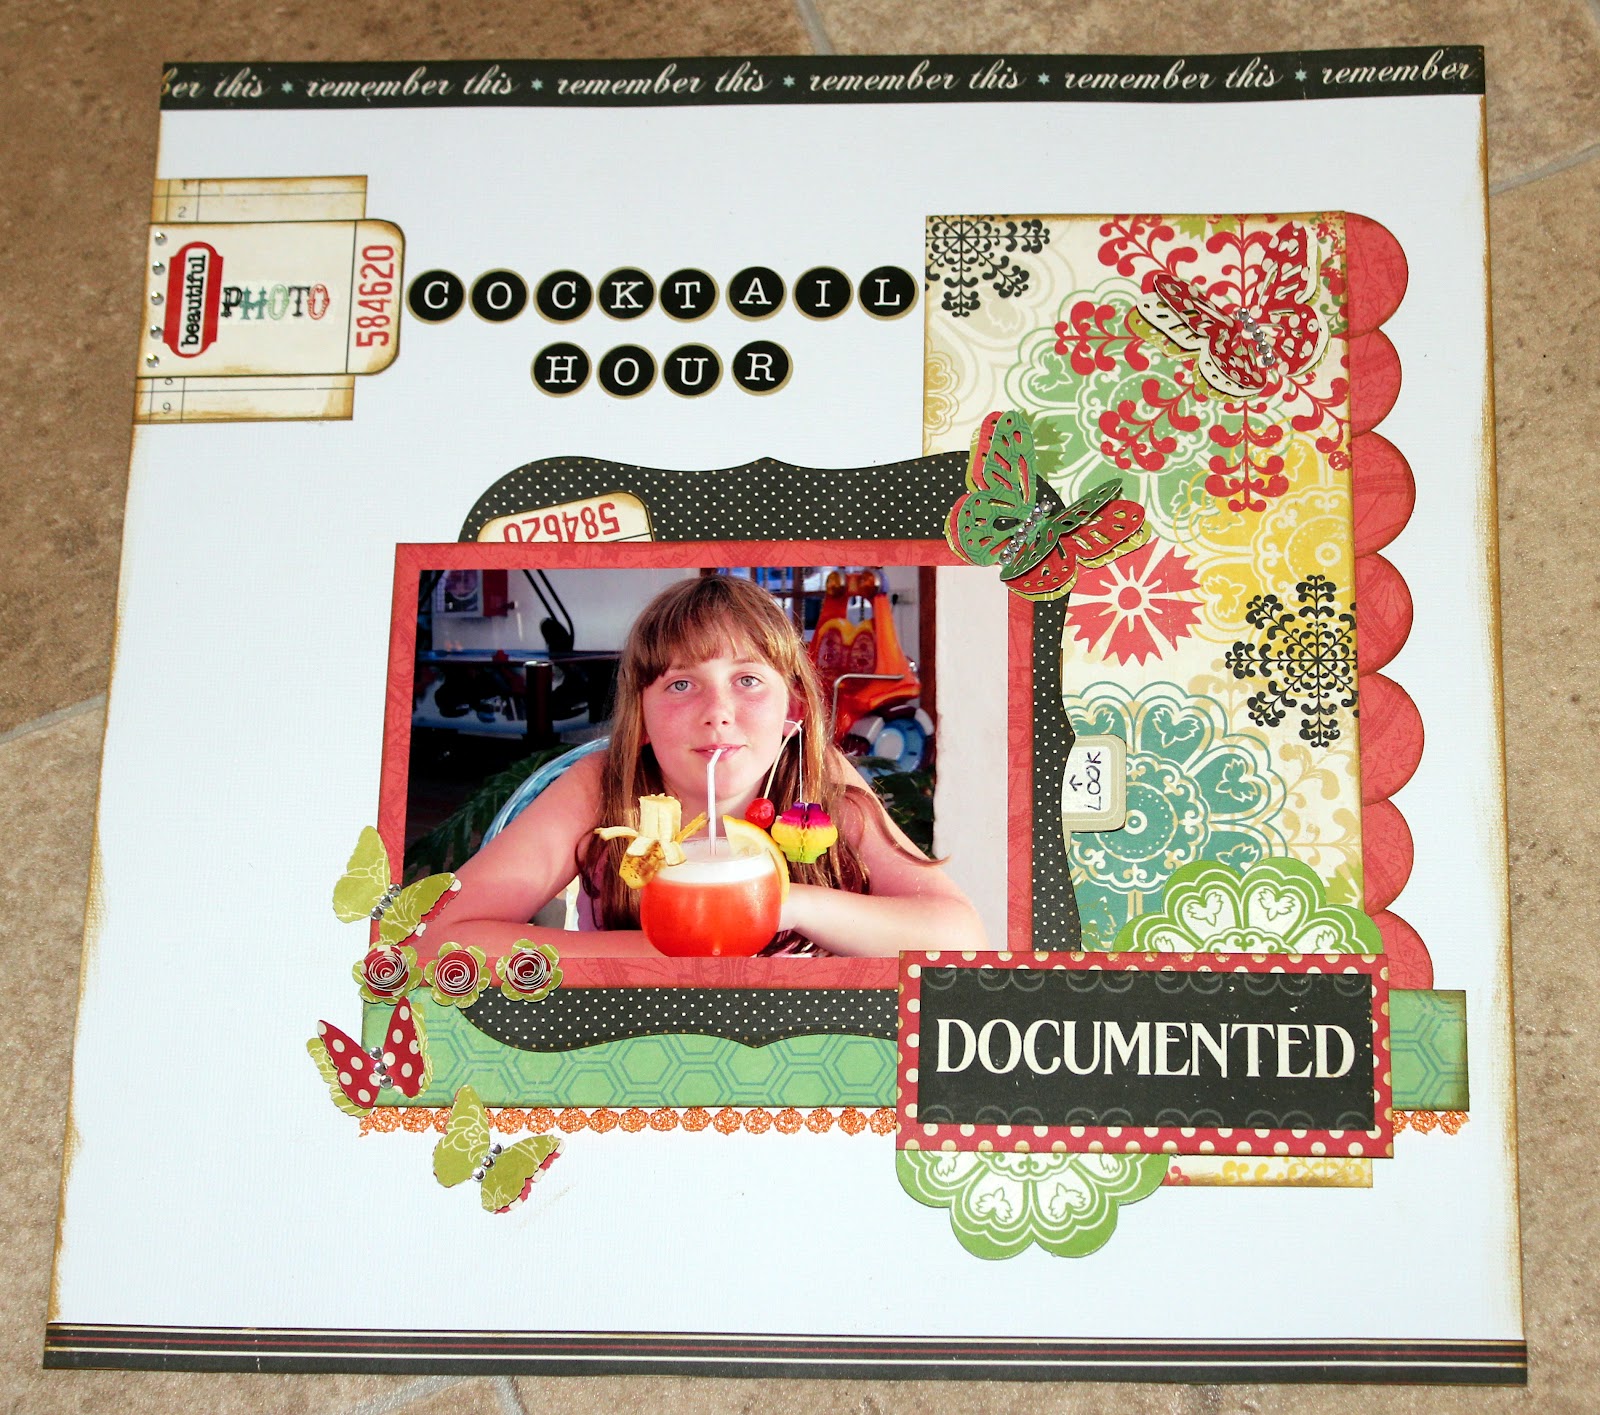
Not blogged for a while, seem to have been so busy doing.....well nothing much really. My friend Caroline had a Stampin' Up party at the beginning of February and then signed up to be one of their Independant Demonstrators so I've made some card samples for her and a couple of layouts whilst buying lots more Stampin' Up products, which I have fallen in love with, just because everything co-ordinates and their stamp sets are so versatile. Next week will hopefully see me signing up to be an Independant Demonstrator too, I will be Caroline's first "downline".

The photograph in the layout above was rescued from the house of my husband's uncle who sadly passed away recently. Relatives were clearing the house and the photo, in a lovely frame, were heading for the tip until I spotted it and decided that the photo, of Uncle Jim's mother and older sister, was family history and should be preserved. I scanned the photo onto my computer and reprinted it, the original, in it's lovely frame has pride of place on my dining room wall along with a lovely antique wall clock he left to us. When I saw the free 12 x 12 papers and gorgeous stamp sets that Stampin Up were giving away with every £45 spent, as part of their Sale-a-bration promotion, I decided to create this layout using them.

I used a sheet of 12 x 12 Crumb Cake cardstock and papers from the Everyday Enchantment Designer Series papers. The stamp for the corners of the layout are from the Fresh Vintage stamp set (my favourite). I punched a label using the Decorative Label punch and Heart to Heart punches from Stampin' Up and put the names of the two ladies on the layout above the three hearts. The lettering, ink and thick lace were from my existing stash.

Saturday 11 February 2012

How Old?

My friend Caroline had a Stampin Up party at her place last week and I treated myself to one or two goodies. Kathy and myself stayed over and we had a fabulous craft day, watching the snow come down. It was so relaxing and we just chatted, laughed and ate naughty food whilst scrapbooking and/or card making. The stamps and punches I ordered arrived yesterday so I swung by and collected them. Today, whilst hubby was down in London with his friends, I locked myself in my craft room and set myself a challenge of creating a layout using the free Stampin Up 12 x 12 papers I got and as many of the stamps and punches I bought as I could possibly get on the page. I managed to use the owl punch, the label punch, the pennant punch, the pennant stamps, the four frames stamps and some love hearts cuts using the love hearts punch which wasn't mine. The title is How Old? This is a dig at my hubby who at the ripe old age of 46 keeps adding to his collection of teddy bears, he has over 300 of the darn things, all over the house. I had said no more teddies but my daughter bought him this one as it's a numbered collectors item.

Wednesday 11 January 2012

Forever Love


Here is the second of two layouts I made at the weekend using some Prima Pixie Glen papers I bought in a craft shop sale recently. I think I just used two sheets of the same paper, one side had the dots and the other had lots of strips and small squares etc, perfect for cutting up and laying onto some white cardstock. The pink piece of paper needed jazzing up a bit so I stamped some text onto it, added some tickets and other little pieces from the sheet you cut up and with the tiny left over bits I punched some flowers then made some rolled up flowers for the middles to give them a more 3D effect. I made a tag which I tucked into a pocket behind the photo. The "Forever" part of the title is from a sheet of sticker embellies that have been kicking around in my craft room for years and I added the "Love" text from a strip of text, again on the side of the patterned paper that you can cut up. As with the first layout, the photo is of friends Alan and Sally on their wedding day.

Sunday 8 January 2012

Your Journey


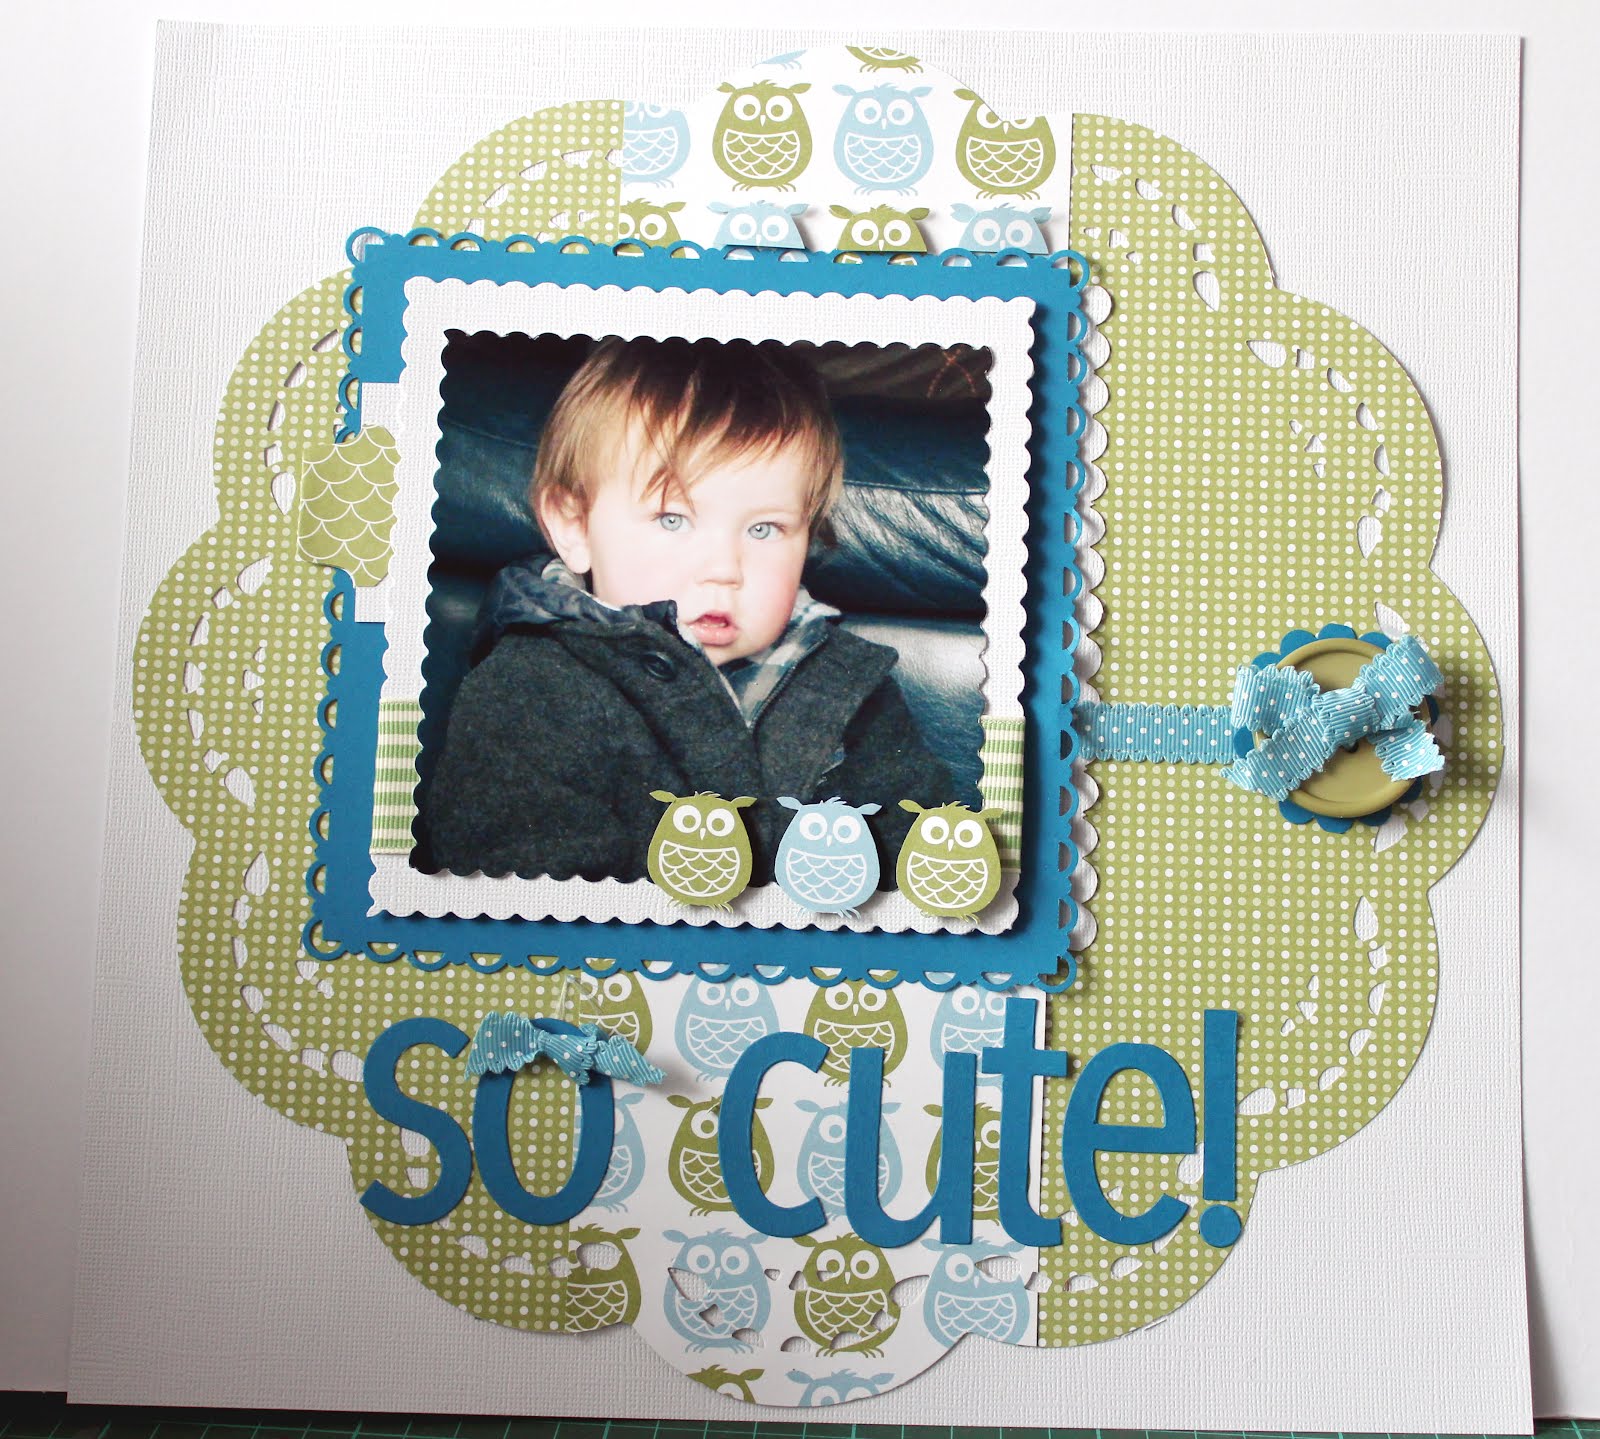
I have had to hide away in my craft room again today (shame) as hubby has been sanding wood ready for painting so to avoid triggering my asthma I stayed well out of the way, with a lovely tube of smarties and some pop, it was like being a kid again.


I wanted to do something with some Tim Holtz die cuts I bought off of ebay a couple of weeks ago. I like to buy the cuts and see if I like them and if I think I will get alot of use out of them and if so I put the die on my wish list. I love this die so it's on it's way to me in the post at the moment. The papers are Prima Pixie Glen collection which were on offer for about 50p each. I used one sheet of Dartmore and one sheet of Chip a Twitter and added a sheet of white cardstock as the base. I like the papers because one side is made up of lots of smaller sections that I cut up and layered and there were extra bits to tuck away like the postcard. I punched circles from the few bits of leftover paper then cut and rolled them into flowers and added some bling using a Bazzill stitch template. I inked up the Old Jalopy die cut cos it was cut from shiny white cardstock and added that to the bottom of the layout. The photo is of our friends Alan and Sally at their wedding and I converted it to black and white to fit in with the layout.


Wednesday 4 January 2012

Diet 2012 Time For Change


Happy New Year! I started the new year at our friends Chris and Jo's house, watching two Chinese lanterns trying to ignite a connifer hedge and the petrol station at the other side of the hedge. Chris, dressed as a blue Smurf was trying to put out both the lanterns whilst Superman, Batman, and Flash Gordon stood by watching and drinking beer!! Myself, that's R2D2 and my hubby, aka C3PO also stood by, assisting by taking photographs in case evidence was needed in the Arson charge against those bad, bad people who ignited the lantern in the first place aka blue Smurf, Weird Science Lady and Bananaman. Yes the party was fancy dress and the theme was characters from movies of the 1980s, what a laugh!!


Anyway, still being overweight and unhealthy after numerous diets and health kicks I have decided (again) that this year is the year that I will get fit and stay fit. As part of my Document 2012 scrapbook album I will be doing a monthly layout charting my success and I started with the above layout showing me today (in between rain storms) raring and ready to go. I also got myself a plain covered 2012 diary and covered it with patterned papers and some chipboard numbers and I will be using this to record what I am eating and any exercise and weight and inch loss throughout the year. Fingers crossed for a successful year.